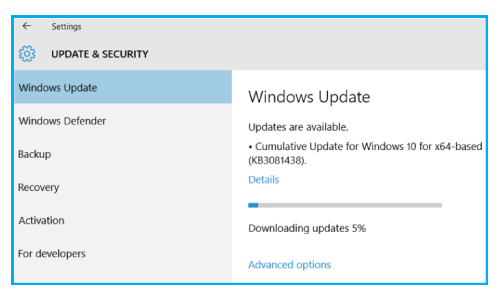
Windows 10 update patch on your system is very important in network configurations, also the server patching is available in windows which will enables the Updating.
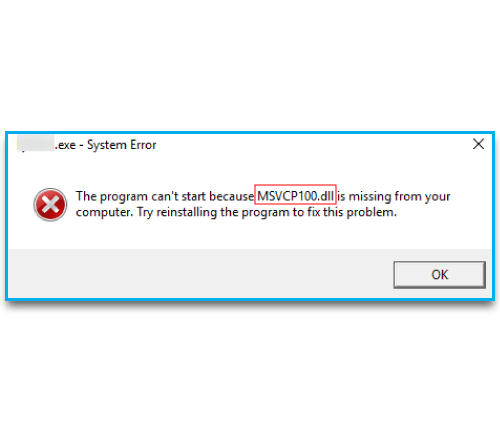
If you don’t get clear this msvcp 100 dll Missing then it will affects the startup and shutdown process of the computer, So following are the simple instructions to get clear that error on your PC.
Download Microsoft Visual C++ 2010 service pack 1 Redistributable package online.
Install the software and reboot your computer.
This software repairs the damaged dll file or replaces it if required.
In order to avoid this error, you need make sure that automatic updates are turned on.
Updating your operating system periodically will help you prevent from msvcp 100 dll missing.
If you have accidentally deleted the dll file, you can download it from any website.
Paste it in the System 32 folder of your computer.
If your operating system is a 64 bit version, you need to paste the file in WIndows – >SysWoW folder which is located in the C:// drive.
The iTunes 45054 error message appears on your system if the iTunes application is outdated, contains any corrupted system files, or has poor internet connection status. Read the troubleshooting steps given below and proceed the same to fix the iTunes error 45054 windows 10 issue on your system easily.
Steps followed to fix iTunes error code 45054 on windows 10
Close the iTunes application on your Windows 10 system if it opened.
Now, hold down the Windows or Control & Escape buttons on your system’s keyboard.
Enter the Program Data keyword in the search field.
Press Enter. Now a dialog box will appear on the screen.
Make sure that all files are displayed. If any file or folder is hidden, click the View tap followed by the Hidden Items option.
Locate the Apple folder and open it.
Navigate to the iTunes section and select the SC Info and adi folders. Click the Delete button.
Once the selected folders are deleted, restart your Windows 10 system and relaunch the iTunes application.
Check if the error message has disappeared on the screen.
Click the Call button to contact technical experts for more assistance in carrying out the troubleshooting process and to fix itunes error 45054 windows 10.
Error code 52 windows 10, device was not recognised by your PC, you have update driver and followings are the simple solution for getting recognising.
HOW TO FIX ERROR CODE 52 WINDOWS 10 ?
Following are the simple steps to carry out the steps mentioned below to fix the error code 52 Windows 10 on your Computer And It Will make it simple of your device.
SOLUTION 1 – UPDATING THE DRIVER USING THE DRIVER EASY SOFTWARE
Download the Driver Easy software from the manufacturer site and then install it on the Windows 10 Computer as per the manual instructions.
Once you launch the main window of the Driver Easy software, click the Scan Now button on the main panel.
This will scan the Windows 10 Computer for any driver problems.
Click the Scan tab at the left panel
Find the Update All button that is located at the bottom end of the screen and then click it.
SOLUTION 2 – DELETING THE VALUES OF THE UPPERFILTERS AND LOWERFILTERS
Make sure to create a backup of the values. To create a backup file, proceed with the steps given below.
Right-click the Class option and then select the Export option.
After giving the name for the exported file, select the backup folder and then click the Save button.
On the computer’s keyboard, press and hold the Win and R keys at the same time. This will open the Run window.
After entering the ‘regedit’ word, click the OK button in the Run window.
As soon as the User Account Control prompt window pops up, click the Yes button.
Navigate to the ‘Computer -> HKEY_LOCAL_MACHINE -> SYSTEM -> CurrentControlSet -> Control -> Class’ location.
Now, go to the Class section and select 36FC9E60-C465-11CF-8056-444553540000.
Right-click the UpperFilters tab option at the right panel of the screen.
Click the Delete button followed by the OK button.
After right-clicking the LowerFilters option, click Delete -> OK.
After closing the Registry Editor window, restart the Windows 10 Computer by clicking the Restart Now button for clearing the error code 52 windows 10.
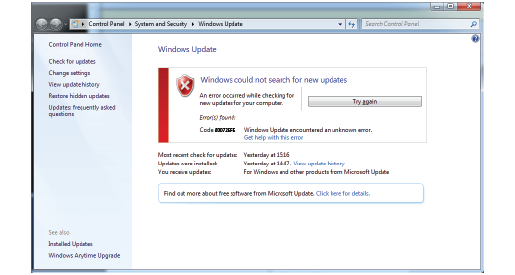
While uou try to improve windows error code 80072efe update server it will cause to connection interruption and then update server on your PC with our guidance. heck if there are any issues with windows error code 80072efe update the Internet connection. If it is unsteady, then this issue can occur. Check if there are any issues with windows error code 80072efe update the Internet connection. If it is unsteady, then this issue can occur.
RESTART YOUR SYSTEM:
Make sure you have disabled the Firewall before initializing the update process.
Check if there are any malicious app that is causing this problem. Uninstall it and then proceed with the windows error code 80072efe update procedure.
After trying out these common troubleshooting steps, if the error is still not resolved, then you can try out the solutions that are mentioned below.
REPAIR YOUR WINDOWS SYSTEMS
Open the Control Panel by pressing the Windows and the X keys together.
Go to the search box and key in Troubleshooting. Select the View All option.
Tap the Windows error code 80072efe Update option and make use of the guidelines displayed on your screen to resolve the issue.
Select the Command Prompt (Admin0 option after pressing the Windows and X keys simultaneously.
Tap the Yes button and type cleanmgr in the command prompts. Press the Enter button.
Once the tool runs successfully, all the junk files will be displayed. Click the OK button to successfully remove the files.
SYSTEM DRIVER UPDATE PROCESS:
Place the mouse pointer on the My Computer option and right-click on it to select the Properties option.
Choose the Device Manager option and check if there is any device with a yellow exclamation mark.
You have to right-click on that device and select the Update Driver option.
Once the update process is over, you have to restart your computer and check if the windows error code 80072efe update has been resolved.
While correcting the windows 10 0xc000007b error code .NET framework work correctly in your system using simple solution. a ways to remove the corrupted files on PC.
HOW TO SOLVE WINDOWS 10 ERROR CODE 0xc000007b ?
The Windows 10 Error Code 0xc000007b indicates that the application you tried to open is unable to start or open. Make use of the instructions specified to rectify this error.
RESTART YOUR SYSTEM:
Click the Power icon from the Start menu and then select the shutdown option.
Click the Power icon from the Start menu and then select the shutdown option.
Choose the Restart option from the drop-down menu and wait until the computer turns on.
Check if the Windows 10 Error Code 0xc000007b issue has been resolved.
First, check if your OS is up-to-date and then proceed to the .Net framework update process.
Launch the manufacturer’s site from your web browser and download the update file.
Install it on your system using the guidelines that the setup wizard provides.
When you try to write on your system but that shows the disk write error windows 10 which means it remove the write protection. here are steps to remove the error.
pen the Steam service on your Windows computer.
Click the Steam tab at the upper-left corner of the screen.
Select the Exit option to close the Steam program.
On the Windows desktop, find and double-click the Steam icon to open.
If you are not able to find the Steam icon on the desktop, navigate to the Search menu and search for the Steam program to fix the fix the disc write error windows 10.
On the Windows 8 or 10 computer, find the Win icon at the bottom-left corner of the screen.
Click the Power icon followed by the Restart option to reboot the system.
Solution 2 – Removing Write Protection Error
Connect a USB drive or SD card into the computer’s port.
Launch the File Manager on the Windows 10 computer.
Select the Exit option to close the Steam program.
Find the file that is write-protected and select it.
Launch the File Manager on the Windows 10 computer to remove the disc write error windows 10.
Navigate to the General tab, remove the checkmark next to the Read-only option, and click OK to close the Properties window.
Right-click the Steam icon. Select the Run As Administrator option.
To fix these type of error in the Windows 10 system, read the guidelines given below and proceed with the same. You can easily fix this errors in your computer and to solve the critical service failed error in windows 10 with our simple way of guidance.
Steps to fix the error
You can fix this issue by performing a System Restore operation from Safe Mode.
To perform a System Restore from Safe Mode, follow the steps given below.
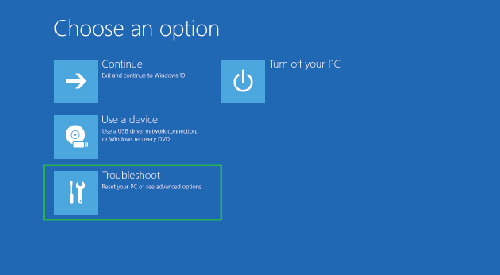
Restart your system. While restarting your system, you can find the Boot Options.
On the Boot screen, navigate to the Troubleshoot option, and click the Advanced Options followed by Startup Settings to fix the critical service failed error.
Now the Restart button will appear on the screen, click it and wait for your system to restart.
The list of options will be displayed on the screen while the system restarts.
To turn on your system into the Safe Mode, press the F4, F5, or F6 keys available on your system keyboard
You can run the System Restore Tool once the system starts in a safe mode
Use the System Restore tool option to restore the older version of your system.
If the above method does not work, then repair your Windows 10 system using Windows Install Media.
To repair your Windows 10 system, first, get a bootable USB or DVD to fix critical service failed error in windows 10.
Navigate to the Windows Install Media section and select the Boot using the Windows 10 USB or DVD option.
Make sure to deselect the Installing Windows 10 option.
Select the Repair option. Wait for the repairing process to complete.
The error found during the boot process is fixed automatically.
Once the repair process is done, restart your Windows 10 system, and check if the issue is resolved.
If the critical service failed error remains unchanged, then refresh your Windows 10 system by following the instructions given below.
While your Windows 10 system restarts, select Boot Option –> Troubleshoot –> Reset this PC –> Keep my files.
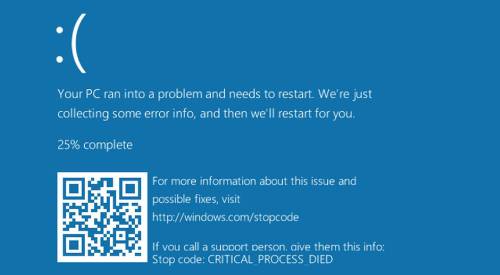
If your Windows 10 system’s screen turns blue, then it indicates a fatal system error. The blue screen error or BSoD is the common error faced by many Windows system users most of their try to know how to fix blue screen of death windows 10 here is the simple solutions to correct that one.
When your Windows 10 system’s screen turns into blue, the first thing you have to do is disable the automatic restart feature.
By default, the restart automatically option is enabled on the Windows 10 system. So, when the STOP or BSoD error occurs, your Windows 10 system automatically restarts when the blue screen of death windows 10 is occurs
The error codes will be displayed on the screen.
To note down the error codes, press the STOP button for awhile.
To disable the Automatic Restart option, follow the instructions given below.
On your Windows 10 system, locate and right-click the This PC icon.
Choose the Properties option from the context menu list.
Click the Advanced System Settings tab.
Navigate to the Startup and Recovery section and click the Settings button.
Now the Startup and Recovery dialog box will appear on the screen.
Check if the Automatically restart option is enabled. If so, click the checkbox beside it to disable it.
To save the settings, click the OK button.
You can also use some antivirus software to fix this blue screen of death windows 10
Run a full system scan using the antivirus software installed on your Windows 10 system.
Perform the on-screen instructions to fix the threats found during the scan process.
Check if your Windows 10 system is up-to-date with the latest security patches and other updates.
If not, update your Windows 10 system to fix this blue screen of death windows 10.
If the above method does not work, boot your system in safe mode.
To do that, navigate to the Settings section on your Windows 10 system.
If you have windows server patching in your PC that means your program get changing. here is the solutions to get patching and it wont come again in your future
Windows server patching is an essential process to make our system more secure from threats, viruses, and hackers.
Makes the computer program more updated, improvised functionality, and bug fixed.
Patches fix the security vulnerabilities and performance of the computer.
Scheduling is the first step in windows, and it should be made every month periodically.
Patches are commonly applied to the test environment primarily for testing, and then it was used to the production (system).
Microsoft usually releases the patches on the second Tuesday of every month. Therefore, downtime is vital in performing the Patches.
The administrators are responsible for notifying all server’s performance after hosting a patch.
After scheduling, the patches must be downloaded in proper time.
The patches should not be applied until the Window gets opened.
If you are unable to identify the necessary for your Windows server, then use the Microsoft MBSA Scan tool to determine the Patches needed.
Make a checklist of progress to carry out the process of patching correctly.