Windows Update Error

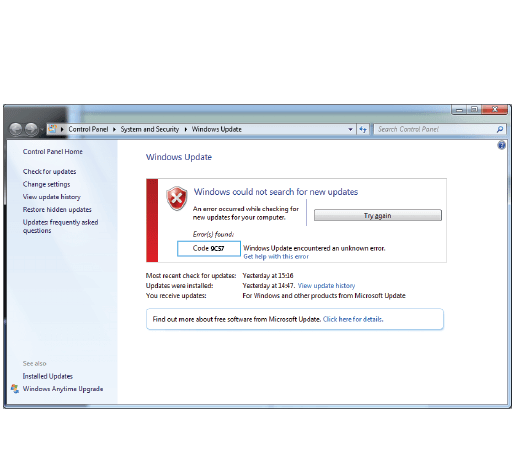
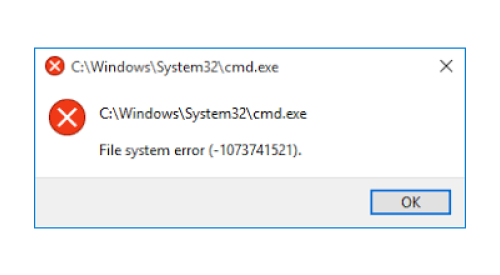
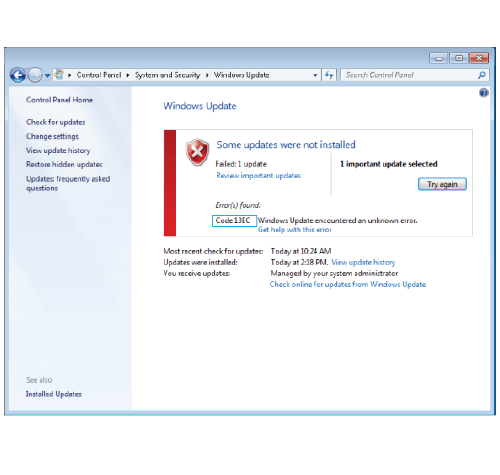
If the Windows operating system had a problem while updating, you can manually install the update packs that are available online. If you see an error message, perform the following steps to fix the windows update errors.

First, run the Reset Windows update tool to solve this issue.

  • First, download the Reset Windows update tool, and save the file in the desired location.
  • The wureset.zip file is now present in the download folder.
  • Right-click the file and then select Extract All option.
  • Next, proceed to run the wureset file with the administrator rights by selecting Run as administrator.
  • Now, press the Enter key while the User Account Control prompt appears.
  • The Reset Windows update tool will now run and then restart the service and then fix the windows update errors.
  • And it has the many kinds of error codes and options to fix it so, please visit our website.
Windows Update Error

System File Error Windows 10

The File System Error on Windows 10 may be due to malware attacks, obsolete driver software, and corrupted system files. It can also be caused by the recent changes that you have made on your system file error windows 10.

Carry out these steps to fix this error on Windows 10:

  • Open your Windows desktop and type ‘cmd’ in the search panel to open the Command Prompt to fix the system file error windows 10.
  • Give a right-click on the command prompt to select the Run as administrator option.
  • Alternatively, press Windows + R shortcut key to open the Run panel and type ‘cmd’ to run the Command Prompt as administrator.
  • Enter the ‘chkdsk /f’ command in the window and press the Enter button.
  • Open the in-built security tool for Windows, which is named as Windows Defender and open the Windows Defender Settings page.
  • Click on the Shield icon that is available in the left side panel to open the Virus & threat protection settings.
  • Click on the Advanced Scan option and select Full Scan to scan the malware-infected files on your computer to prevent the system file error windows 10.
  • Change your Windows theme and sound scheme to default settings and check if the error gets resolved or not.
System File Error Windows 10

Windows Error Code 0x80004005

On Windows 10 has some of the errors which means that the Windows update folders are corrupted or a Windows update failure. This error code generally appears while trying to install the Windows updates while to fix the windows error code 0x80004005.

Follow these steps to fix this issue using the Windows Update Troubleshooter tool:

  • Select Update & Security to open the Troubleshooter from the left side panel.
  • Choose the Windows Update option and click on the Run the troubleshooter button to fix the Windows Error Code 0x80004005.
  • Now, follow the on-screen instructions to troubleshoot the issue.
  • Restart your Windows and check if it allows you to update.
  • If the problem remains unresolved, run System File Checker(SFC) on your Windows using Command Prompt. SFC is an in-built troubleshooting tool that checks for system and to fix the Windows Error Code 0x80004005.
  • Windows might have encountered a virus that corrupts the update-related system files.
  • Navigate to the Start menu and type ‘cmd’ in the search box to open the Command Prompt window.
  • Give a right-click on the Command Prompt tab and select the Run it as administrator option to fix Windows Error Code 0x80004005
  • Type the ‘sfc /scannow’ command in the Command Prompt and press the Enter key.
  • Wait until the scanning gets completed. If there are no system errors detected, then proceed with the following steps.

Resetting Update services on Windows:

  • Before resetting the Update Services on your Windows computer, you must rename the folders containing the installations of recent updates to avoid issues in the future.
  • To know how to delete the update related folders on your system, contact our technical team by clicking the call button on this screen to fix the Windows Error Code 0x80004005.

Windows Error Code 0x80070035

The error codes prompts that “the network path was not found” on the device. It usually occurs when the user types an incorrect path name. Windows users can connect to another computer without any cable connection between them by sharing the same network. This error also occurs when the guest trying thttps://windows10.business.blog/2020/01/23/windows-error-code-0x80070035/o access a folder, types a wrong path then update Windows Error Code 0x80070035.

Carry out these steps to resolve the Windows Error Code 0x80070035

  • First, recheck the sharing settings and verify that the network is shared appropriately.
  • To check the Sharing settings, navigate to the drive you wish to access and give a right-click on the storage drive to open Properties.
  • Select the Sharing tab and verify that the network path displays Not Shared.
  • Click on the Advanced Sharing button to access the settings.
  • Select the Share this folder checkbox and verify the Share name inside the Settings section
  • Select Apply –> OK to save the changes.
  • Close the window and press Windows + R shortcut keys on the keyboard to open the Run panel.
  • Type the name of the folder in the text box and click on the OK button.
  • Now, check if you could access the same folder again.
  • If the problem persists, follow the below-mentioned steps to share using the IP address of the computer and to fix the Windows Error Code 0x80070035
  • Open the Windows desktop and type ‘cmd’ in the search box.
Windows Error Code 0x80070035

Continuum For Windows 10

Continuum is one of the new feature in Windows 10 that comes into play with both the Start screen and the modern apps, switching the view to the format suited to PC or tablet use.

This feature turns your Windows phone into a big screen projector and a big time productivity tool. You can use an adapter or dock to connect a TV or any monitor, and then open any app to see a content on a larger screen. Show off your favorite stuff on a Windows 10 PC without the use of an adapter or dock while you use the continuum In windows 10.

YOUR WINDOWS PHONE BECOMES COMPUTER

  • Use your Windows phone like a PC
  • You can create and edit office documents on your phone as like in PC
  • You can also send email and can even type text messages on your connected screen.
  • When you are done with all of your stuffs, it is saved on to your phone.
  • Watch videos, upload your photos, or surf the web on your connected screen.
  • The above process has to be done while you using the continuum In windows 10
  • Even when you connect your phone to a PC or to any display or monitor, you can still use your phone as an actual phone.
  • You make and receive phone calls.
  • You can send and receive text messages
  • You can also check your social media apps.
  • If your phone is connected to a PC or to any display and you want to use your phone to control your connected screen with the help of continuum In windows 10

Change your Background

You can change or set the background photo on your connected screen more often as you like. To change the background photo on your connected screen continuum In windows 10 has the option for that,

  • Click on the Start icon, swipe over to the All apps list, and then select Settings from the list, then select Personalization -> Start.
  • Under Second display, make your own choice.

Set up Continuum for your Windows phone

  • A TV or monitor with HDMI input.
  • A Mobile phone running Windows 10 that is compatible with Continuum.
  • A compatible accessory to connect your phone with the TV or monitor.
  • A power outlet in your devices to plug in your dock or adaptor.
  • The two types of accessories that you can use to connect your phone with a TV or monitor.
  • For wired connection, you can use wired docks to connect your phone with a TV or monitor.
  • For wireless connection, use Mira cast adaptors to connect your phone wirelessly with a TV or monitor.

Code 9c57 Windows Update Error

Code 9c57 windows update error on your PC, here take a simple steps to update the error codes in windows. optimise your computer for better performance by manually.

Steps To Solve The Error Code 9c57

  • The 9c57 windows update error is displayed on the screen when you try to install Windows IE9 on a Windows 7 system.
  • You can fix this error code manually by installing the Internet Explorer application on your system.
  • Check if your Internet Explorer application is up-to-date.
  • If it is running out of date, then download and install the latest version of the Internet Explorer application from the official site of Microsoft while code 9c57 windows update error.
  • If the troubleshooting instructions mentioned above do not resolve the code 9c57 issue, try to perform the installation process one at a time.
  • On your Windows system, launch the Windows Updates wizard.
  • Locate and select the Important Updates available option.
  • Select the one and uncheck the other updates.
  • Once the selected one is updated, start installing the next one.
  • Continue the process until you finish installing all the updates.
  • To get more remote assistance in fixing this issue, contact our technical experts by clicking the Call button available on this screen once code 9c57 windows update error.
Code 9c57 Windows Update Error

Windows 10 Update Error Code 13ec

f your computer freezes for a few seconds or stops responding while updating the system. Fix this issue by following the simple troubleshooting instructions given below.Here are the simple instructions windows update error code 13ec.

Steps To Update The Error Code

  • First, install the latest Microsft .NET Framework on your system.
  • Go to the official Microsoft site.
  • Download the latest version of .NET Framework.
  • After downloading, install it by following the on-screen instructions.
  • Obtain assistance over the phone to activate your product key :
  • Make sure to restart your computer after installing .NET Framework.
  • After that, try to update your Windows system.
  • If the above troubleshooting method does not work, then try to reset the Windows update components manually then only windows update error code 13ec.
  • To do so, you have to delete the Software Distribution folder available in the Windows updates installer section.
  • After deleting them, check if you are able to run perform the update.
  • Check the memory space of the hard disk drive.
  • If the hard disk drive is almost full, delete some unwanted files or folders on it and then try to update your Windows error code 13ec.
  • you will finish the clean reinstall windows 10 on your computer.
  • If you still receive the same error code and unable to update your Windows system, click the Call button to contact our technical experts for windows update error code 13ec.
Windows 10 Update Error Code 13ec

Clean Reinstall Windows 10

If you are upgrading from a previous version of Windows- such as Windows 7 or Windows 8, follow this article to obtain structured information on the update and installation. The functionality of this article is two fold. It provides information on both previously released versions and for clean reinstall windows 10 of your previous version from a Windows upgrade.

If you are using a preview version of Windows 10, be aware that it is a trail version and will expire within a stipulated time frame. This means that you have to update to the final version or revert to the version previously installed version. Based on the Requirements traceability matrix or RTM, Microsoft intends on providing upgrades for the final version within the trial version of Windows 10. Users appreciate the transparent testing process and even those who are not previously exposed to field testing are inclined to join. You can choose to upgrade to the paid version of Windows 10 or revert to the previously used version itself. Read on to find out more details and information of clean reinstall windows 10.

Recovery partition

Certain versions of Windows come with a pre-installed recovery partition option. This option comes in handy when a clean reinstall windows 10 is required if your system crashes. To start with you will have to boot your system by clicking on any of the function keys provided on your keyboard. The function key can be any key from F1 to F12 or the Tab key or the Delete key. Even if the recovery partition is not enabled on your computer, as is the case with Windows 7 or Windows Vista, you can use the recovery media that comes with the software as a CD or DVD. They come as single or multiple discs, labelled as Recovery Operating System. Install the drivers according to the serial number displayed on the CD. If your disc is dysfunctional or damaged, approach your system manufacturer for the recovery media.

Open Microsoft.com on your browser to obtain all the required OEM contact numbers.

Cellular Settings In Windows 10

Certain PCS enabled on Windows 10 come with a SIM card that allows you to connect to a mobile network and configure a cellular settings in windows 10. This means that you can get connected over a network wherever you have a cellular signal. It doesn’t matter even if your PC does not have a SIM card, you can still get connected to a cellular network through some other alternative options. Plug in using an external cellular device such as cellular modem or mobile broadband device. You will need to have a data plan from a mobile operator to connect.

Connect to a cellular network for the first time

In order to configure to configure the cellular settings in windows 10 then connect to a cellular data network for the first time, use these steps.

From the right corner of your taskbar screen, select the network icon which may be of either wired or wireless i.e., Wi-Fi icon or Ethernet icon.

Then from the listed results, select the cellular network and then select Connect.

You will notice the name of your mobile operator which is next to the Cellular network icon often configuring the cellular settings in windows 10.

If the computer prompts you for a user name and password, type your user name and password and then enter the access point name (APN)

If required, check the information that comes along with your PC, SIM card, or cellular device for detailed information about what settings to use.

Then if you want to know about the full setting for cellular settings on windows 10 to visit our website to get full of information’s.

Cellular Settings In Windows 10

Battery Saver Mode On windows 10

Here are the simple steps for battery saver mode windows 10 to extend your mobile battery life. it helps to conserve your battery life with the much longer life time.

an windows mobile use the many kinds of advantages for saving the battery life it is very important to all of the windows users. so, we decide to give instructions to the users those who will not aware of the battery saving mode on windows 10.

If you want to know more about the battery saving mode please visit our website and to know about the simple steps to improves your battery life.

Battery Saver Mode On Windows 10
Design a site like this with WordPress.com
Get started