Windows 10 Support And Configuration

MS Windows 10 or Install Setup If you just upgraded your PC or computer are facing hassle upon hassle, you are not alone. Whatever the problem, we’ve got many ears and Windows 10 Support and Configuration Help .

Take a look at the services of windows 10 set up we offer below and choose whatever suits your need.

Competent Professionals

A team equipped with intense knowledge and extensive research skills, our technicians have been chosen with a knack for problem-solving in windows 10 support an configure. Avail our services for quick fixes, in no time at all.

Timely assistance

The Windows 10 support and the technical team at our website have been trained to keep it simple. Even insurmountable errors are handled like a breeze here and you will be back on track in no time.

Advice and Guides

Generic tips, user guides, software windows 10 set up update support and their reviews can all be availed with us. Keep checking our website to get access to more such stuff, it will come in handy someday.

Services Provided by Windows 10 support solutions

Installations On Windows 10

Although similar to installing any other Windows version, it may be tricky for some users. If Windows 10 support Help and Support is your choice, our instructions will help you get to it faster.

Windows 10 Driver Installer

After Windows 10 support and installation , many users experience a lot of errors. If you are in the same boat, we’ve got the perfect rescue team. Get our MS Windows 10 now!

Mobiles On Windows 10

Although available for use on mobiles, Windows 10 support is simple and easy for some users. To make it easy for you, we’ve built this exclusive Windows 10 mobile support forum.

Get Printer In Windows 10

To print from a Windows 10 PC, your printer has to be Windows 10 support solutions compatible and have an windows 10 update support driver. Get your printer driver updated here to start printing with ease.

Network issues in windows 10

A faulty network connection can lead to a diverse range of issues on your system. Check out our compilation of user manuals to resolve network errors exclusively on Windows 10 support.

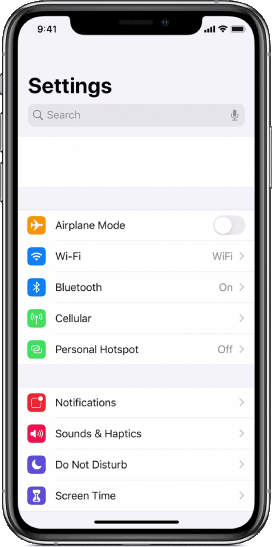
Know More About Windows 10 Setup Support

To get detailed information about the windows 10 support and software version you are using and to know about upgrades, follow our website. Drop in regularly and we’ll keep you posted. What sets us apart?

Dysfunctional or unresponsive task bar

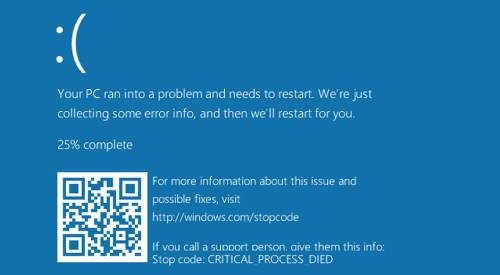
After upgrading from a previous version of Windows to Windows 10, many users find that the task bar on their PC becomes unresponsive. This can be due to a number of reasons- error while installing Windows 10, to name one. Although not an error of any major concern, this error decreases the productivity of your PC and hence diminishes your total output. If this is the case with you, use Windows 10 Help and Support.

Unable to access Setting or Windows store:

When an upgraded version of Windows is installed on your PC, make sure it is installed correctly. If not done according to the guides, the version of windows 10 support update may start on your PC. This error is most commonly observed with a Windows 10 upgrade, after which some users will be unable to access Settings or the Store on their PC. Get instant Windows 10 Support for the same here.

Wireless networks are unavailable/ PC cannot connect to the network:

After upgrading your software to Windows 10, it is not uncommon for your PC to be unable to discover wireless networks. Even if you use a built-in Ethernet adapter with Wired/ Ethernet connections, the network fails. Check if the issue is being caused because of an uncooperative VPN software present on your PC. If your Windows 10 PC still fails to connect to available networks, check our manuals for Windows 10 Help and Support.

Those Who Are Supporting Windows 10

We are a team of well-equipped technicians with a singular mission of providing elaborate and efficient services for all Windows 10 users to do windows 10 support and setup. Contact us for instant and expert support.

Supporting Windows 10

Gmail Not Sending Emails Remote Server

If you cannot send email from your Gmail account to a remote server, consider these steps to fix the error gmail not sending email;

  • Maintain the SMTP server settings such that it accords with the remote server details.
  • To verify the authentication, check your outgoing mail server port numbers, server names, and password with the information given below;
  • Incoming mail server: smtp.gmail.com
  • Port Numbers: 587/465
  • Encryption: TLS/SSL
  • Disable the Firewall and other security settings while accessing the Gmail server.
  • When using the email client for sending mail from your Gmail account, the client mail account settings should sync with the Gmail server settings.
  • Check if the domain name and the username of the recipient are right once you fix the error gmail not sending emails.

Gmail Not Sending Emails To Remote Server

Outlook 2016 POP3 Not Receiving Emails

If you are not receiving emails on your POP3(Post Office Protocol version 3) account in Outlook 2016, check the internet connection first and restart your Outlook application. Close all other running applications running on your computer. Check if you are using the obsolete OS version. If so, upgrade your OS and check if the problem has been solved. If the problem persists, follow the below-mentioned troubleshooting methods to clear that the POP3 not receiving emails.

Outlook 2016 POP3 Not Receiving Email

Solution: 1

  • Open the Outlook 2016 application and click the Send/Receive tab.
  •  Under Preferences, click the Work Offline option and check if the message “Connected to Server” appears at the left-bottom corner of the screen.
  •  Navigate to the Send & Receive group and click the Send/Receive All Folders button.
  •  Now, check whether the message is in the Sent folder or exist in Outbox

Solution: 2

  •  Clear the Junk folder on your Outlook 2016 by locating the Junk Email folder and marking it as junk.
  •  The reason for the email blocking issue in Outlook 2016 may also be due to the junk email protection filter.
  •  Therefore, change the protection level to “no automatic filtering” by selecting Junk Email Options  No automatic filtering  OK. for fixiong the POP3 not receiving emails

Solution: 3

  •  On the Outlook 2016 home screen, click the File tab and go to Info.
  •  Under Info, click the Accounts button.
  •  Navigate to the server settings window and verify the settings.
  •  Check whether the POP option is selected in the Account Type pull-down bar.
  •  Make sure that the incoming mail server name is entered correctly, and the corresponding authentication is enabled.
  •  Click the More Settings button and ensure that the port numbers are entered correctly.
  •  Make sure that the necessary check boxes are selected.

Solution 4:

  • Check the Forwarding settings in Outlook first by clicking the Settings button.
  •  Select View All Outlook Settings and navigate to the left side panel.
  •  Click the Mail option and choose Forwarding located at the right-side panel.
  •  Turn off the Forwarding settings by selecting the Stop Forwarding option.
  •  Click the Save button to save and apply the changes.
  •  If the POP3 not receiving emails problem remains unsolved, click the Call button available on this screen to get remote assistance from our technical support team.
Outlook POP3 Not Receiving Emails

Email Setup Center

How to Syncing Mail with Android ?

The guided instructions given below will help you to syncing mail account on your Android device.

  • Locate the Settings option on your Android device, and select it.
  • Select Accounts  Add Account  e-mail.Choose your e-mail account type from the menu list.
  • Tap the Other button if your e-mail account type is not displayed.
  • Accept your phone’s terms & conditions to finish the sync process.
  • After the sync process, touch the Next button, followed by Done.
Steps For Sync And Exchange Email With Android

How to Sync work Email with Android ?

  • Power on your Android device, scroll the menu screen and tap the Settings option.
  • Scroll down the Settings screen until you see the Account option.
  • Tap the Add account option. Now the list of email account types will be displayed on the screen.
  • Choose your syncing mail account type if available on the menu list.
  • Otherwise, tap the Other button, perform the on-screen instructions.
  • Make sure to enter the valid information in the text fields.
  • Once the sync is done, tap the Save button and exit from the application.

How to Sync my Outlook Email with my Android Phone ?

To sync your outlook email using the Android phone, follow the guided instructions given below.

  • On your Android device, navigate to the Account option, and choose syncing mail account (Google) type from the list.
  • If your account type is not displayed on the Accounts screen, then tap the Next option.
  • Enter your account credentials for login.
  • Tap on your Account, choose the services you wish to sync, and touch the Save button.
  • Now your email account is sync with your Android device successfully.
Syncing Outlook Mail With Android

How to Sync Office 365 Email with Android?

Perform the following guidelines to sync Office 365 email with Android.

  • First, touch the Settings icon.
  • Next, touch the Accounts & syncing mail option.
  • Touch the Add account option and then touch the Corporate option.
  • Now, type the Office 365 email address and password in the required field.
  • Based on the mobile device and configuration done for the domain name.
  • Check whether the Use Secure Connection option and Accept all SSL certificates are ticked and selected.
  • After completing the Account setup-is done, touch the Select option, and then touch the Next option.
  • The device will now check the server settings online.
  • Next, accept the IT policy and then touch the OK option.
  • Select the Syncing option that you want and then touch Next.
  • Type the name of the account and then touch the Next option.
  • Now, activate the account, and the email, contacts, calendars will start to download to the mobile device.
Syncing Android With Email Outlook

How to Sync Android Email with Outlook ?

Proceed with the steps below to sync an android email with outlook.

  • First, go to the Play Store and download the Outlook Android application.
  • After the installation process is done, launch the application and syncing mail.
  • Next, touch the Calendar icon and then touch the 3 dash menu.
  • Next, ouch the Add Calendar icon and then touch the Add an account option.
  • Now, make sure to register the email address and proceed with the instructions on-screen to login.
  • After completing this step, touch the check mark to save the account to the Outlook Android application.


How to Sync Godaddy Email with Android ?

The steps below will help you to sync the Godaddy email with Android.

  • First, launch the email application that is installed on the Android device.
  • From the menu, scroll down, and touch the Settings option.
  • Under that touch Add syncing mail account option and then choose Other.
  • For some Android system, this option is named as Email.
  • Now, type the full email address in the email address field.
  • Enter the email password in the password field.
  • Touch the Manual Setup option.
  • Now, choose the POP3 account or the IMAP account.
  • Type the incoming email server as POP.secureserver.net.
  • Ensure to set the port to 110.
  • For IMAP, the incoming email server is IMAP.secureserver.net and check whether the port is set as 143 and then tap Next.
  • Make sure that the syncing mail address and the password are correct and then touch Next.
  • After the authentication process, you are ready to start sending and receiving email on the Android device.
Outlook Email Configuration

How to Sync Microsoft Exchange Email with Android ?

The guidelines below will help you to sync Microsoft Exchange email with Android.

  • First, check whether the device is connected to the data network through a mobile device or any other wireless connection.
  • Next, on the Android device, open the menu and then touch the Settings option.
  • Scroll down to the end of the Settings screen and then touch the Add account option.
  • Touch the Microsoft Exchange Active Syncing mail from the Add account screen.
  • Enter the domain name and the password and then touch the Next option to proceed.
  • The Android device will locate the Exchange server.
  • On the Remote Security administration screen, touch the OK option.
Outlook Email Setup Configuration


How to Sync Android Tablet with Email ?

Perform the guidelines below to sync the Android tablet with email.

  • On the Home screen of the Android device, touch the Apps icon, and then select Email.
  • Now, from the inbox, touch the Menu icon.
  • Next, touch Settings  Sync Settings  Sync schedule.
  • To edit certain options, you can touch the option and then choose the settings that you want.
  • Now, touch the Back icon and then touch Period to sync Email and then choose an option.
  • Touch the Size to retrieve emails options by selecting Size to retrieve emails or while roaming.

How to Sync Bigpond Email with Android ?

You can sync Bigpond email with Android by the following steps.

  • First, go to Applications and then touch the Settings icon.
  • Touch Accounts and then select the Add account option.
  • From the list, choose the syncing mail option.
  • Now, key in the required credentials and then touch the Manual Setup option.
  • Choose the IMAP account and enter the required details in the fields available there.
  • SMTP server  mail-bigpond.outlook.com
  • Choose SSL security type and touch Next.
  • To complete this setup, touch the Next option and then Touch Done.

Brother Mfc j6945dw Paper Jam

Brother J6945dw Paper Jam

Steps For Clear The Paper Jam On Printer

  • Turn ON the brother Mfc j6945dw paper jam printer and pull out the paper tray from the printer.
  • If you have loaded paper in the top paper tray, remove all the sheets from it.
  • Lift the paper support and take it out.
  • If any paper sheet is present inside the printer, remove it carefully without tearing the sheets.
  • Lift the green flap separator to check for any paper jammed inside it. If present, remove it.

Open the clear jam cover behind the printer. Take out any paper stuck inside by gently pulling it with both hands and close the cover. Remove any paper bits or craps present inside the manual feed slot. Open the scanner cover and check the platen area for any paper bits.Check if you have removed all the blue tapes from the printhead. Press and hold the Cancel button on the printer for about five seconds if the printhead is in the lock position.

  • When the print head moves to the centre of the platen, check for paper scraps at the sides.
  • Slide the print head left to right and remove any paper bits and scraps if present.
  • Close the scanner cover and insert the paper support tray.
  • Check whether the paper guides are fixed correctly according to the paper size.
  • Fan the paper well and align it before placing it on the paper tray.
  • Load paper only below the maximum paper mark.
  • Adjust the paper guides in such a way that they do not crush the paper sides, as this may lead to a jam.
Cleaning The Printer Head

If you get brother Mfc j6945dw paper jam on your printer it is a usual thing, Follow our simple instructions once you get this error on your LCD display and fix.

Upgrading Your Printer Using The Printer Setup Instructions:

Little more instructions to be used to configure your brother J6945dw printer header, This is will help you to avoiding the paper jam.

If the paper jam is occurred on your printer it will leads to damage your printer after the your multiple prints.

Making your printer is more powerful let you follow our simple instructions.

This is the simple process that should be followed by you.
  • Select Maintenance and tap remove paper scraps.
  • Press Start to begin the process.
  • Pull out the paper tray and take out any scraps inside it.
  • Insert the paper tray again and open the scanner cover. Check for paper bits and scraps present on the platen area.
  • Close the scanner cover and insert a paper into the manual feed slot and check whether the guides are adjusted correctly.
  • Press the ink icon on the touchscreen and select Improve ink quality.
  • Select the Check Print Quality option and tap Start.
  • Press the Home button and restart the printer to fix the Brother Mfc j6945dw Paper Jam issue solved.

Windows 10 Installation Support

Windows 10 Support The Reactivating PC After Hardware Change And how To Setup

If you have an idea to make a hardware change in your PC such as replacing the motherboard, You will have to link your Microsoft account to windows 10 digital license on your device. Doing this will help you reactivate windows using the activation troubleshooter. This is applicable only in windows 10 support.

Here i explain and give a solution to the many kinds of windows error codes. Which is very useful to the users. We have many ears to to here and fix your windows 10 queries.

Some Of The Windows Error Code’s

  • Blue screen of death windows 10
  • Windows error code 1903
  • windows script host error
  • Windows error code 13ec
  • Windows error code 45054
  • Windows error code 52
  • Windows 10 cortana troubleshooter
  • Windows 10 network configuration
  • Windows 10 account setup
  • Best feature apps for windows 10

This is one of my best times for finding this website and I like to say thanks to all, This is the best comprehensive data about the marketing strategy well, exactly we will know what will actually happen in the marketing field. Then, let’s move on to the technology-oriented field the first thing is the computer, may of the users don’t know how to handle that error functions so, I decide to provide a better instructions to fix that windows error codes so get the best instruction to all of your windows error queries.

If you have any doubts please refer this website to clear and fix your windows 10 queries.

Blue Screen Of Death Windows 10

Windows 10 Installation Support

Windows 10 support the reactivating PC after hardware change and how to setup

Hmmm, This is well i want to thank to you all, here are the best solution to find and fix the windows error codes. Now a days is fully based on the technology oriented only. So, technology means i am talk about the computer (windows). Many of the users can use the windows onl so, it has some of the error codes nor error’s so i decide to give a instructions to that users. If you have any doubts please visit my site.

Internet Problems And Solutions

Kernel data inpage error windows 10 that will cause to affect your hard disc of your computer. here are the simple solutions to solve it, simply go an get solution.

The Network troubleshooter can be used to analyze and fix common communication problems. You can get connected to the network using this troubleshooter and then run some networking commands if required to troubleshooting for internet problem and solution.

Type Network troubleshooterin the search box on the taskbar, and then click Identify and repair network problemsfrom the available list of results.

Kernel Data Inpage Error Windows 10

Kernel data inpage error windows 10 that will cause to affect your hard disc of your computer. here are the simple solutions to solve it, simply go an get solution.

The other reasons behind this error are mentioned here.

  • Hard drive errors.
  • Loose or faulty wires and connections
  • Invalid BIOS settings
  • Damaged motherboard chipset drivers.
  • Virus or malware infection.
  • System file corruption.
  • Outdated or corrupted device drivers.
  • Paging file corruption.

The solutions below will help you resolve the Kernel Data Inpage error on your Windows 10 computer.

Kernel Data Inpage Error Windows 10

Windows 10 Patching In Offline

Do windows 10 patching in offline with our simple guidance on your PC. now a days windows have the facility for updating your patches in offline mode with an simple.

Steps to update Windows 10 patching in offline

  • On the web browser, navigate to the official website of the WSUS Offline Update page.
  • Click the Downloads tab, move to the Most Recent Version section, and select the version to start downloading the WSUS Offline Update software on your Windows computer.
  • After downloading the software, go to the Downloads folder and double-click the WSUS Update Offline file.
  • Search for the Update Generator.exe file to update windows 10 patching in offline.
  • When you see the next window on the screen, click the Windows tab.
  • Select the checkbox next to the appropriate option below the name of the version of the computer’s Operating System.
  • Make sure to checkmark the boxes next to the Include Service Packs and Include Windows Defender Definitions options.
  • Move to the Office tab. After selecting the necessary options, click the Start button at the bottom-left corner of the screen.
  • Now, the Command window opens.
  • Close the Command window. When you see the prompt box on the screen, click the No button.
  • Close the Command window. When you see the prompt box on the screen, click the No button.
  • Select the Client file and click the UpdateInstaller.exe option.
  • When you see the WSUS Offline Update Installer window, select the checkbox next to the Install NET Framework 3.5 option.
Windows 10 Patching In Offline

Design a site like this with WordPress.com
Get started